Monday 8 November 2010

Storage in Forensic Labs

As you probably appreciate the Sausage Factory type of computer forensics lab has to store and retain vast quantities of data. In the early days, even in the Sausage Factory, we imaged individual hard drives to individual hard drives. But because of the volume of data and the economics of this methodology we realised that we had to use some form of centralised storage. That was in 2002 and since then we picked up a few tips along the way.

I know of a number of LE labs that have invested large sums (£100k plus) buying their storage area networks. Unfortunately further down the road they could not afford to increase capacity, had maintenance issues, or had other difficulties exacerbated by the shear complexity of their set up. At the other end of the scale I know of sizeable outfits who stick to imaging to hard drives because they believe that they would never acquire the budget to go down the centralised storage route.

I believe there is a middle ground. It is possible to buy 26TB of useable RAID6 storage (32TB raw), a Server and a backup solution for circa £15k. This solution is scalable with further units of 26TB useable storage costing circa £7k each. With a sensible set of operating procedures this type of solution will remain serviceable and fit for purpose for a number of years.

The observant amongst you will have counted nine raid enclosures in the picture. The youngest unit is a Jetstor 516F which when equipped with 16 2TB enterprise class SAS hard drives provides 26TB usable storage and costs less than £10k. The oldest Infortrend unit is over five years old (and does not store production line data any longer). None of these units have ever lost data. They routinely recover from the inevitable hard drive failures. Although these units are not in the same league as EMC et al they are manufactured for the enterprise and in my experience have longevity built in. It is possible to provide similar levels of storage even cheaper with consumer grade equipment but this would probably be a false economy.

All of these units are directly attached (via fibre) to a server. I have found that both Intel and HP manufacture (and support) servers that will probably last forever. Again I look after servers that have not missed a beat in five years.

Although I have found that this type of kit will last I think it is sensible to plan to cycle replacement of primary production line equipment over a three to four year period. Since 2002 I have learnt a lot about this type of kit but have also found that choosing a supplier that will hold your hand when necessary can be particularly useful. In the UK I have found that VSPL understand the needs of LE computer forensic labs and most importantly have always been available to support me when required.

This type of setup, in my experience, has worked well in supporting the production line nature of our forensics work. However a certain way of operating it is required. Which if I had to sum up in two points the first is that storage performance is best alongside processor performance - on the forensic workstation, and secondly if you want data resilience keep two copies of your data (in one form or another) at all times.

Obviously there is a little bit more to it than that. If you are interested in finding out more please let me know,


Saturday 9 October 2010

FTK Imager 3

FTK Imager has always been the crème de la crème of free forensic tools and now with the introduction of FTK Imager 3 it is even better.

Access Data have added some amazing functionality to this programs already extensive list of capabilities - in fact to steal a phrase - its almost magical and it is certainly available at an unbelievable price. So what am I referring to?

The answer of course is the new image mounting feature which allows a user to mount an image as a drive or physical device. Encase evidence files, Smart image files, Advanced Forensic Format images and dd images are supported. Additionally Encase Logical Evidence Files and Access Data's AD1 custom content images can be mounted logically. Full details in the Release Notes.

This functionality is accessed via File/Image Mounting

In this screen shot I have chosen to mount a drive from a Mac which includes a Bootcamp partition


This resulted in the EFI partition, the HFS+ partition and the NTFS Bootcamp partition all being given a drive letter. The whole drive is allocated the Physical Drive Number 4 in this example.

All of these resources are now available natively upon the machine that FTK Imager 3 is running on. The Physical Disk however is not listed in Disk Management nor does this functionality appear to install any devices within Device Manager.

Logical mounting of non windows partitions (HFS+, EXT3 et al) will present an explorer view of these file systems as FTK imager itself sees them (à la Encase VFS).

This functionality provides many benefits and at first look at least, renders the costly alternatives of PFS/VFS and Mount Image Pro redundant. It also raises the bar in how we can construct virtual machines from images due to the ability to mount more than one drive at once, thus simplifying the creation of multi drive VMs. The functionality also facilitates non techies (lawyers, fraud investigators et al ) to easily peruse images.

FTK Imager 3 also introduces support for VXFS, ex FAT and EXT4 file systems. As we sometimes say in England it's the dogs...


Tuesday 7 September 2010

Hiberfil Xpress

Departing on platform 2 .... I seem to have lost my train of thought ..... ever since I started drafting this post I have had to cope with lyrics of Crosby, Stills and Nash's Marrakesh Express floating around in my brain. OK I know I've lost two thirds of my readership already - Crosby Stills and WHO?

This post, once I've overcome a touch of nostalgia, is about the use of compression by Microsoft in the Hiberfil.sys file. From a forensic point of view this fact can be quite important and I have seen reference to this compression in a few of the other forensics blogs as the result of the work of Matthieu Suiche. I also know that functionality exists in Xways to decompress Hiberfil.sys but until now this functionality was absent in Encase.

The reason Microsoft uses compression is to minimise the footprint of Hiberfil.sys. The compression seeks to reduce Hiberfil.sys to about 75% of physical memory size. The presence of this compression can be identified easily - it exists in chunks typically 16 x 4096 bytes in size, each chunk having a header \x81\x81xpress . Not all hiberfil.sys files utilise this compression.

The reason it matters to us can be demonstrated by looking at a fairly common task for us forensicators; finding traces of Windows Live Messenger conversations. In the worst case scenario, when logging is turned off and the user has not saved their conversation, traces of conversations may only be found in memory (or artefacts of memory created on disk). Hiberfil.sys is used to store the contents of memory when the computer concerned is hibernated and therefore potentially may contain Microsoft Notification Protocol messages relating to WLM conversation. A fairly typical grep keyword used to find these traces is \x20PF= . When run over a hiberfil.sys containing xpress compression results may appear similar to the following screenshot:


It can be seen that the message and the surrounding MSNP is a little garbled. This is because this message is within a xpress compressed block. Decompressing the block and viewing the same message results in:


It can be seen that the MSNP and the message is now in plain text. Until now achieving the decompression for Encase users required the use of another tool but I am pleased to report that after discussing this issue with Guidance Software's Simon Key he wrote an enscript for this purpose. The script can decompress all xpress blocks within hiberfil.sys and write them out to a logical evidence file. Alternatively it will decompress each block in turn and then perform a keyword search against it. Blocks containing search hits are written into a logical evidence file. The script is available at GSI's download center.

Finding traces of MSNP is only one use, you can find index.dat contents, Limewire search terms and many other interesting artefacts in Hiberfil.sys - happy searching!

References
http://www.forensicswiki.org/wiki/Hiberfil.sys
http://msdn.microsoft.com/en-us/library/ee915356(PROT.13).aspx


Friday 6 August 2010

USN Change Journal

This post includes

  • a new method to recover USN Change Journal artefacts from unallocated
  • some background information
  • some commentary on benefitting from the existing work of Lance Mueller and Seth Nazzaro

Background
The examination of USN Change Journals is nothing new and was commented on as long ago as September 2008 in Lance Mueller's blog. My interest was piqued more recently when Harlan Carvey discussed the python script written by Seth Nazzaro to parse these Journals.

The update sequence number (USN) change journal provides a persistent log of all changes made to files on the volume. As files, directories, and other NTFS objects are added, deleted, and modified, NTFS enters records into the USN change journal, one for each volume. Each record indicates the type of change and the object changed. New records are appended to the end of the stream. Programs can consult the USN change journal to determine all the modifications made to a set of files. The part of the USN change journal that matters to us is the $USNJRNL•$J file found in the $Extend folder at the root of applicable NTFS volumes. This file is a sparse file which means that only non zero data is allocated and written to disk - from a practical point of view the relevance of this will become obvious in the next section of this post. The capability to create and maintain USN Change Journals exists in all versions of NTFS from version 3.0 onwards. This means that they can exist in all Windows versions from Windows 2000 onwards, however the functionality was only turned on by default in Vista and subsequent Windows versions.

You might be thinking by now - why from an evidential perspective does the USN Change Journal matter? A good question and in many cases with data in a live file system USN Change Journal entries might not assist. However it may be relevant to establish the latest event to occur to a file. The event is recorded by creating a reason code in each record within the journal. These reason codes are detailed in Lance's post and by Microsoft here. Where I think the journal entries may be more useful is in establishing some information about a file that no longer exists in the live file system but is referenced elsewhere.

Lance Mueller's Enscript
Lance's script is designed to parse a live $USNJRNL•$J file and output the parsed records into a CSV file. Like Seth Nazzaro I found that when I tried to run the Enscript Encase hung. This turned out not to be a problem with the script but a problem with how Encase presents sparse files. My $USNJRNL•$J file was recorded as being over 6GB in size. Only the last 32MB (or thereabouts) contained any data, the preceding data was a lot of zeroes -00 00 00 00 ad infinitum. Because the file is a sparse file the zeroed out portion of the file is not actually stored on disk - it is just presented virtually. However it appears that the script needed to parse through the almost 6GB of zeroes before it got to the juicy bits which gave the appearance of the script hanging (or resulting in Encase running out of memory). The solution to this was simple - copy out the non zero data into a file entitled $USNJRNL•$J. Create a folder named $Extend and place your extracted file into it. Drag the folder into a new Encase case as Single Files. Rerun the script which will then process the entries almost instantaneously.

Seth Nazzaro's Python Script
Seth wrote his script because he had difficulty in running the Enscript -possibly for the reasons described above. I have described how to run the script in my earlier Python post. The script is useful in validating results ascertained by other means and particularly for the comprehensive way it parses the reason codes (many record entries contain more than one reason code and the way they amalgamate together can be a bit confusing). The script also outputs to a CSV file.

Recovering USN Change Journal Records from unallocated
Regular readers will know that I am particularly keen in recovering file system and other data from unallocated. I am pleased to see I am not alone. In many cases because of OS installations over the top of the OS where your evidence was created we have no choice but to recover evidence from unallocated.

It is possible to locate large numbers of deleted USN Change Journal Records in unallocated clusters. There is a clear structure to them.


To carve these from unallocated I use my file carver of choice Blade. I have created a Blade data recovery profile which recovered a very large number of records from my test data.

Profile Description: $UsnJrnl·$J records
ModifiedDate: 2010-07-14 08:32:57
Author: Richard Drinkwater
Version: 1.7.10195
Category: NTFS artefacts
Extension: bin
SectorBoundary: False
HeaderSignature: ..\x00\x00\x02\x00\x00\x00
HeaderIgnoreCase: False
HasLandmark: True
LandmarkSignature: \x00\x3c\x00
LandmarkIgnoreCase: False
LandmarkLocation: Static: Byte Offset
LandmarkOffset: 57
HasFooter: False
Reverse: False
FooterIgnoreCase: False
FooterSignature: \x00
BytesToEOF: 1
MaxByteLength: 1024
MinByteLength: 64
HasLengthMarker: True
UseNextFileSigAsEof: False
LengthMarkerRelativeOffset: 0
LengthMarkerSize: UInt32

You may wish to be more discriminatory and carve records relating to just avi and lnk files for example. A small change to the Landmark Signature achieves this.

LandmarkSignature: \x00\x3c\x00[^\x2E]+\x2E\x00[al]\x00[vn]\x00[ik]

The next step is to process the recovered records. Given we already have two separate scripts to do this all we have to do is to present the recovered records to the scripts in a form they recognise. This is achieved by concatenating the recovered records contained within the blade output folders


This can be achieved at the command prompt, folder by folder > copy *.bin $USNJRNL•$J. However if you have recovered a very large number of records and have a considerable number of Blade output folders this can be a bit tedious. To assist with this John Douglas over at QCC wrote me a neat program to automate the concatenation within the Blade output folders (email me if you would like a copy). John's program Concat creates a concatenated file within each output folder in one go. Once you have the concatenated $USNJRNL•$J files you can then run either script against them. Please note the folder structure the enscript requires as referred to above.

Carving individual records in this fashion will result (at least in my test cases) in the recovery of a lot (possibly hundreds of thousands) of records. There will be considerable duplication. Excel 2007 or later will assist with the de-duplication within the scripts output.

Given the potentially large number of records that are recoverable I found it sensible to

  • run a restricted Blade Recovery profile for just the file types you are interested in (e.g. avi and lnk)
  • Run John Douglas's concat.exe across Blades output
  • In Windows 7 use the search facility to locate each concatenated $USNJRNL•$J file
  • copy them all into one folder allowing Windows to rename the duplicates
  • at the command prompt use a for loop to process them along the lines of
    >for /L %a in (1,1,40) do python UsnJrnl-24NOV09.py -f "UsnJrnl$J (%a)" output%a -t
    or
    >for /L %a in (1,1,40) do python UsnJrnl-24NOV09.py -f "UsnJrnl$J (%a)" -s >> output.tsv
  • or drag the concatenated files back into Encase as single files and process further with Lance's script.

References
http://www.opensource.apple.com/source/ntfs/ntfs-64/kext/ntfs_usnjrnl.h?txt
http://www.microsoft.com/msj/0999/journal/journal.aspx
http://technet.microsoft.com/en-us/library/cc976808.aspx
http://wapedia.mobi/en/USN_Journal
http://code.google.com/p/parser-usnjrnl/
http://www.forensickb.com/2008/09/enscript-to-parse-usnjrnl.html


Friday 23 July 2010

Python

As regular readers will know here in the Sausage Factory our primary forensics tool is Encase. From time to time however we need to try out other tools to validate our results. Recently I wanted to utilise two python scripts widely discussed elsewhere and as a result had to figure out the mechanics of getting these scripts to run on a forensic workstation running Windows 7. I thought I'd share the process with you. Now some of you are highly geeky programmer types who write and run scripts for breakfast - if thats you turn away now. This blog post is in no way definitive and is intended for python newbies wishing to run python scripts in their forensicating but who until now didn't know how.

First off we need to install and configure Python

  • Download Python - I downloaded Python 2.7 Window X86-64 installer for my Windows 7 64 bit box
  • Run the installer
  • Right click on the Computer icon, select properties, select Advanced system settings and click on the Environment Variables button.
  • In the System Variables pane you will have a variable entitled Path, select it and click on edit
  • Add to the entries already there ;C:\Python27 (assuming you installed Python 2.7 to the default location)

The two scripts I wanted to run were David Kovar's analyzeMFT and the $USNJRNL parser written by Seth Nazzaro. They are designed to parse MFTs and USN Change Journals respectively which can be copied out of an image or made available via VFS or PDE. More about analyzeMFT can be found at the author's blog. Detailing how I ran these scripts will give a clear indication of how to run these, and many other python scripts, and utilise their output.

analyzeMFT
Download script by visiting http://www.integriography.com/ and right clicking on the Downloaded Here link in the Downloads section (for the source code) and saving the download as a text file. Once downloaded change the file extension to .py.

Save it somewhere and then run IDLE (installed with Python) and open the analyzeMFT.py script. Locate the words noGUI = False and edit to read noGUI = True and save.

To run

  • open command prompt
  • at prompt type Python C:\Path_to_the_script\analyzeMFT.py -f U:\Path_to_your_extracted_or_mounted_MFT\$MFT -o $MFT_parsed
  • The above command runs the script against your extracted or mounted $MFT and outputs the results to a file $MFT_parsed
  • Open $MFT_parsed using the text import wizard in Excel selecting the text format for each column.

Thanks to David Kovar for making this script available.

$USNJRNL•$J Parser
This script can be downloaded at http://code.google.com/p/parser-usnjrnl/.

To run

  • open command prompt
  • at prompt type Python C:\Path_to_the_script\UsnJrnl.py -f U:\Path_to_your_extracted_or_mounted_USNJRNL•$J\USNJRNL•$ -o Output_file -c
  • The above command runs the script against your extracted or mounted $USNJRNL•$J and outputs the results to Output_file.csv

Notes
Typing at the command prompt Python path_to_script.py wil give some help about a scripts options. For example Python UsnJrnl.py results in the output

Usage: UsnJrnl.py [options]
Options:
-h, --help show this help message and exit
-f INFILENAME, --infile=INFILENAME
input file name
-o OUTFILENAME, --outfile=OUTFILENAME
output file name (no extension)
-c, --csv create Comma-Separated Values Output File
-t, --tsv create Tab-Separated Values Output File
-s, --std write to stdout

I have installed Python 2.7. There are other (and later) versions available including some that are not completely open source. It is also possible to install Python modules to provide a GUI. I have not installed these - takes the fun out of running scripts!


Monday 19 July 2010

Gatherer Transaction Log Files - a Windows Search artefact

A recurring theme in many examinations is the prevalence of evidence in unallocated clusters. Reinstallation of the OS is often to blame and a recent case where XP was installed on a drive where the previous OS was Vista further complicated matters. All relevant data had been created during Vista's reign and the challenge was to determine what files and folders existed under this OS. The Encase Recover Folders feature assisted to an extent as did Digital Detective's Hstex 3. Loading the output of Hstex 3 into NetAnalysis allowed me to identify the download of a number of suspect files and some local file access to files within the Downloads folder.

The next step was to carry out a keyword search utilising the suspect file names as keywords. This is always a good technique and results in the identification of useful evidence in a variety of artefacts (e.g. index.dats, link files, registry entries, NTFS file system artefacts et al) but because in this case every thing was unallocated identifying all the artefacts was a little tricky. A considerable number of the search hits were clearly within some structured data but the data was not an artefact I was familiar with.

I have highlighted Record Entry Headers to draw attention to the structured nature of the data. This screen shot is of test data where the file names/path are stored as unicode as opposed to ASCII in the case I was investigating.

A bit of googling led me to page 42 of Forensic Implications of Windows Vista - Barrie Stewart which identified the structured data I had located as being part of Gatherer Transaction Log files created by the search indexer process of Windows Search. These files have a filename in the format SystemIndex.NtfyX.gthr where the X is replaced by a decimal number and on a live Vista system can be found at the path

C:\ProgramData\Microsoft\Search\Data\Applications\Windows\Projects\SystemIndex\


These files have the words Microsoft Search Gatherer Transaction Log. Format Version 4.9 as a file header. The files are a transaction log of entries committed to the Windows search database indexing queues. The SearchIndexer process monitors the USN Change Journal which is part of the NTFS file system used to track changes to a volume. When a change is detected (by the creation of a new file for example) the SearchIndexer is notified and the file (providing it is in an indexable location - mainly User folders) is added to the queue to be indexed. The USN Change Journal is also something that may contain evidentially useful information and I will look at it in more depth in a later blog post.

Sometimes artefacts are only of academic interest but it was fairly apparent that this data could have some evidential value. Each file or folder has a record entry; parts of which had been deconstructed by Stewart. I was able to identify two additional pieces of information within each record - the length of the Filename block and a value that is possibly a sequence or index number or used to denote priority. I also observed some variations in some parts of the record that had been constant in Stewart's test data.

  • Record Header 0x4D444D44 [4 bytes]
  • Unknown variable data [12 bytes]
  • FILETIME Entry [8 bytes]
  • FILETIME Entry [8 bytes] or a value of 0x[0100]00000000000000
  • Unknown variable data [12 bytes]
  • Length of file path following plus 1 byte (or plus 2 bytes if file path stored as unicode) [4 bytes] stored as 32 bit integer
  • Name and fullpath of file/folder (ASCII or Unicode -version dependant) [variable length]
  • 0x000000000000000000FFFFFFFF [13 bytes]
  • FILETIME Entry [8 bytes] or a value of 0x[0100]00000000000000
  • 0xFFFFFFFF [4 bytes]
  • FILETIME Entry [8 bytes] or a value of 0x[0100]00000000000000
  • Unknown variable data [4 bytes]
  • Sequence or index number? [1 byte] stored as 8 bit integer
  • Unknown variable data [15 bytes]
  • FILETIME Entry [8 bytes] or a value of 0x[0100]00000000000000
  • FILETIME Entry [8 bytes] or a value of 0x[0100]00000000000000
  • Unknown variable data [20 bytes]

Microsoft do not seem to have publicly documented the record structure. To establish how useful this data can be I came to the conclusion that I needed to recover all of these records from unallocated. I needed an enscript and Oliver Smith over at Cy4or kindly wrote one for me. I wanted the enscript to parse out the file and path information, sequence or index number, the six time stamps and a hex representation of each unknown range of data into a spreadsheet. The script searches for and parses individual records (from the live systemindex file and unallocated) as opposed to entire files. I was astonished at just how much information the script parsed out - email me if you want a copy. Setting the spreadsheet to use a fixed width font (Courier New) lines up the extracted hex very well should anyone want to reverse engineer these records further. As it stands the file paths and timestamps can provide some useful evidential information, particularly when the recovered records have been recovered from unallocated clusters and relate to a file system older than the current one.

Timestamps
Obviously once you have run this enscript or manually examined the records the first question that arises is what are the timestamps. Establishing this has not been as easy as it could be and hopefully a little bit of crowd sourcing will sort this out for all of us. Post a comment if you can help in this regard. One approach is to use the hex 64 bit filetime value as a keyword and see where you get hits. Hits in another timestamp indicates that the timestamp is the same down to the nanosecond. Carrying out this process will result in hits in OS system files and fragments of them. I have found on the limited test data set I have used that Timestamp 3 matched the File Modified (File Altered) date within MFT for the file concerned and the timestamp for the same file in the USN Change Journal. The timestamp in the USN Change Journal record is the absolute system time that the change journal event was logged (1). It is worth reminding readers who are Encase users that Encase uses different terminology for the time stamps within the MFT - file modified is referred to as Last Written. I think it likely that timestamps 1 and 2 are linked to the indexing function (e.g. time submitted for indexing) given the journalling nature of the file but can not either prove this by testing or confirm this within Microsoft documentation. I can say that in testing sorting on Timestamp 1 gave a clear timeline of the file system activity I had provoked within User accessible folders.


Example CSV output of Enscript (click to enlarge)

References
Good citizenship when developing background services for Windows Vista - Microsoft
Forensic Implications of Windows Vista - Barrie Stewart
Forensic Artefacts Present in Microsoft Windows Desktop Search - John Douglas MSc Thesis
Indexing Process in Windows Search - Microsoft MSDN
(1) http://msdn.microsoft.com/en-us/library/cc232038%28PROT.10%29.aspx


Monday 28 June 2010

Safari Internet History round up

The last few posts all concern the recovery of internet history created by the Safari browser. I like to think of internet history in the wider sense and consider any artefact that demonstrates that a user visited a URL at a particular time.

Recovering Safari browser history from unallocated deals with history.
Safari browser cache -examination of Cache.db deals with the cache.
Never mind the cookies lets carve the crumbs - Safari Cookie stuff looks at Cookies.
Safari History - spotlight webhistory artefacts examines Spotlight snapshots of web pages accessed with Safari.

To round things up I will briefly list some other files or locations that may provide internet history created by the Safari browser (the ~ denotes the path is within a user profile)

~/Library/Safari/LastSession.plist
Used to store details of the last browser session allowing a user to select Reopen All Windows from Last Session from the safari history menu.

~/Library/Safari/WebpageIcons.db
~/Library/Safari/Icons.db

Used to store the associations between websites and their favicons.

~/Library/Safari/TopSites.plist
~/Library/PubSub/Feeds/............... .xml
~/Library/Caches/com.apple.Safari/Webpage Previews

TopSites is a gallery of recently visited web sites. The binary TopSites.plist details the websites featured in this gallery. The image representing each webpage is stored within the Webpage Previews folder. This folder also stores any Quicklook representation of a webpage, for example when managing Bookmarks or reviewing History. File names of files in the Webpage Previews folder are the MD5 of the associated URL. Safari monitors whether a page has altered since it was last viewed and appends a blue star to the TopSites view for those sites that have. The xml files in PubSub/Feeds are connected with the monitoring.

~/Library/Safari/Downloads.plist
An xml plist the contents of which are self explanatory.
~/Library/Caches/Metadata/Safari/History/.tracked filenames.plist
A binary plist that may be connected to Safari spotlight web history artefacts.


Tuesday 22 June 2010

Never mind the cookies lets carve the crumbs - Safari Cookie stuff

Safari versions 3, 4 and 5 amalgamates Cookie data into one large file Cookies.plist stored at the path ~/Library/Cookies. This plist is an XML plist. The Encase Internet History search will parse these files and when set to Comprehensive search will find fragments of them in unallocated. However perhaps due to its lack of granularity this search takes forever to run across a Mac and in my experience often fails to complete

As is becoming a recurring theme with my Safari examinations I have turned to Blade to carve out Safari Cookie data from unallocated. The Cookie.plist consists of an array of dictionary objects.


Using Apple's Property List Editor it can be seen that this Cookie.plist has an array of 7074 Dictionary objects. Each Dictionary object is a Cookie in its own right.


Looking at the underlying XML you can see how each dictionary object is structured.


In creating a recovery profile I considered whether I wanted to carve out deleted cookie plists in their entirety or whether I should carve each dictionary object separately. These dictionary objects are fragments of the cookie.plist - hence the crumb reference in the title -after all fragments of cookies are clearly crumbs. I decided that it would be a more thorough search if I carved for the dictionary objects themselves and the following Blade data recovery profile did the business (this data is extracted from Blade's audit log -another neat feature).

Profile Description: Safari Cookie records
ModifiedDate: 2010-06-17 06:33:30
Author: Richard Drinkwater
Version: 1.3.10168
Category: Safari artefacts
Extension: plist
SectorBoundary: False
HeaderSignature: \x3C\x64\x69\x63\x74\x3E\x0A\x09\x09\x3C\x6B\x65\x79\x3E\x43\x72\x65\x61\x74\x65\x64\x3C\x2F\x6B\x65\x79\x3E\x0A\x09\x09\x3C\x72\x65\x61\x6C\x3E
HeaderIgnoreCase: False
HasLandmark: True
LandmarkSignature: <key>Expires</key>
LandmarkIgnoreCase: False
LandmarkLocation: Floating
LandmarkOffset: 0
HasFooter: True
Reverse: False
FooterIgnoreCase: False
FooterSignature: \x3C\x2F\x73\x74\x72\x69\x6E\x67\x3E\x0A\x09\x3C\x2F\x64\x69\x63\x74\x3E\x0A
BytesToEOF: 19
MaxByteLength: 9728
MinByteLength: 200
HasLengthMarker: False
UseNextFileSigAsEof: True
LengthMarkerRelativeOffset: 0
LengthMarkerSize: UInt16

Processing the Carved Files

If your case is anything like mine you will carve out thousands and thousands of individual cookies (or at least the cookie data represented in XML). There are a number of options to process this data further.

Option 1

  • Drag output into Encase as single files.
  • Run Encase Comprehensive Internet History search.
  • View results on records tab.

There are two issues with this method. Firstly Encase does not parse the Cookie created date which is stored as an CFAbsolute timestamp. Secondly there is the issue of duplicates. You will have thousands and thousands of duplicates. These can be managed by hashing the carved files. I would also recommend running the data recovery profile over any live cookie.plists, loading the output into Encase as single files, hashing the output and then creating a hash set. This hash set will allow you to spot additional cookies over and above those in the live cookie plists in any cookies carved from unallocated.

Option 2

  • Concatenate the contents of each output folder by navigating to the folder at the command prompt and executing the command copy *.plist combined.plist.
  • With a text editor add the plist header and array tag at the beginning of combined.plist and the closing plist and array tags at the end.
  • Make sure the formatting of combined.plist looks OK with a text editor.
  • Process combined.plist with Jake Cunningham's safari cookie plist parser.
  • The utility is run from the command prompt using a command in the form
    >[path to Safari_cookies.exe] [path to combined.plist] > cookies.txt
  • This parses the plist into the file cookies.txt
  • This text file may contain many thousands of Cookies. Ideally it would be nicer to port this data into a spreadsheet. To do this I (there is probably a far more elegant way to do this BTW) open cookies.txt in a hex editor (PSPad Hex) and delete all the carriage returns 0D0A. I then find the string Path [50617468] and replace it with 0D0A7C50617468 -in other words preface path with a carriage return and the pipe symbol |. I then find and replace the strings Domain, Name, Created, Expires and Value and replace each in turn with the same string prefaced with | (e.g. |Domain, |Name etc. etc.)
  • I then use Excel's text import wizard to import the edited cookies.txt setting the delimiter to the pipe symbol | only.
  • This results in each row relating to one cookie. You can then utilise Excel's very powerful duplicate removal tool.
Both the Mac and Windows versions work OK and the utility converts the CFAbsolute formatted cookie created timestamp.


Tuesday 15 June 2010

Safari History - spotlight webhistory artefacts

June is Safari month here in the Sausage Factory and this post is the third in the series. Just imagine having an observation point in the house across the road from your suspect. When the suspect surfs the internet the man in the OP (with the help of a good pair of binoculars) makes notes of what he reads on screen (OK.. he may use a long lens instead of binoculars and take photos but bear with me). Essentially this is exactly what Spotlight does when a user utilises the Safari web browser (versions 3,4 and 5) to view web pages - it writes the URL, Web Page Title and all the text content in the web page into a file.

  • These files filenames are in the format URL.webhistory
  • Their internal structure is that of a binary plist with three strings to each record Full Page Text, Name and URL
  • They are stored at the path ~/Library/Caches/Metadata/Safari/History
  • The file created date of these files represents the time that the URL was first visited (since History was last cleared)
  • The file modified date represents the time that the URL was last visited

It can be seen that it is possible to deduce information from these files that amounts to internet history and therefore it it may be appropriate to consider this data along with records extracted from history.plist and cache.db files.

Recovery from Unallocated
These files are deleted when a user clears Safari history. However it is possible to recover these files from unallocated. Using my file carver of choice - Digital Detective's Blade I wrote an appropriate Data Recovery Profile (which I will happily share with you upon request)


Click on image for larger version

Running this profile resulted in the recovery of over ten thousand files. I then added the recovered files into Encase as single files. I noticed that a small percentage of these files had the text content stored as ascii and not unicode text. I am at this stage not sure why.

Investigation of Live and Recovered Spotlight Webhistory Files using Encase
If you review these files using Encase you will see in the View (bottom) pane the relevant data -the URL is at the start of the file, followed by the text in unicode and then the webpage title near the end of the file. If the content is relevant reporting on it is a pain -potentially three sweeping bookmarks are required using two different text styles. The unicode text sweeping bookmark is also likely to be truncated due its length. Therefore reviewing any number of these files this way is not a good plan.

The eagle eyed amongst you will have observed that in my Blade Data Recovery Profile I gave the recovered files a plist file extension (as opposed to a webhistory file extension). This because these files have a binary plist structure and I use Simon Key's binary Plist Parser v3.5 enscript to parse them. This excellent enscript allows the option to create a logical evidence file which creates a file for each plist name/value pair. I run the enscript with this option, add the logical evidence file back into my case and the review the contents with just a unicode text style selected and bookmark as appropriate. This method is much quicker and removes the need to mess about with unicode formatting. It also makes keyword searching easier. For example to view all URLs green plate (set include) your logical evidence file, apply a sort to the name column in the table pane, scroll down to cause each URL to appear in turn in the view pane. Use a similar method for the Full Page Text and Name items.

Click on image for larger version


Miscellaneous Information in relation to the webhistory file format
Prior to considering the Plist Parser enscript to parse these files I briefly looked at its format with a view to tempting some programming friends to write me a parser. I established that

  • The file is a binary plist. I do not want to too far into the intricacies of how these plists are assembled. We are interested in objects within the object table. Binary plists use marker bytes to indicate object type and size. The objects we are interested in are strings, either ASCII or unicode. Looking at Apple's release of the binary plist format (scroll about a fifth of the way down the page) it can be seen that the Object Format Marker byte for ASCII strings found in this file is in binary 01011111, followed by an integer count byte. In hex these marker bytes as seen in this file are 5Fh 10h. The Object Format Marker byte for unicode strings found in this file is in binary 01101111, followed by an integer count byte. In hex these marker bytes as seen in this file are 6Fh 11h.
  • The byte immediately prior to the URL (generally starting http) and after the marker 5Fh 10h decoded as an 8 bit integer denotes the length of the URL. However if the URL is longer than 255 bytes the marker will be 5Fh 11h indicating the following two bytes are used to store the length decoded as 16 bit big endian
  • Following the URL there is a marker 6Fh 11h - the next two bytes decoded 16 bit big endian is the number of characters of text extracted from the web page - multiply by 2 to calculate the length of the unicode text element of the record
  • Following the unicode text element is a marker 5Fh 10h -the next byte immediately prior to the webpage title decoded as an 8 bit integer denotes the length of the webpage title
  • the last four bytes of the file formatted 32 bit big endian is the record size (detailing the number of bytes from the start of the URL to the end of the fifth byte from the end of the file)

Example file format

Click on image for larger version

References
http://opensource.apple.com/source/CF/CF-550/CFBinaryPList.c
http://developer.apple.com/mac/library/documentation/Cocoa/Conceptual/PropertyLists/AboutPropertyLists/AboutPropertyLists.html#//apple_ref/doc/uid/10000048i-CH3-SW2


Tuesday 8 June 2010

Safari browser cache - examination of Cache.db

Following on from my post about Safari browser history I want to touch upon Safari cache. My suspect is running Mac OSX 10.5.6 Leopard and Safari 3.2.1. This version stores browser cache in an sqlite3 database ~/Users/User_Name/Library/Caches/com.apple.Safari/Cache.db. Earlier versions of Version 3 and Version 1 and 2 store cache in a different format, and/or a different place. The Episode 3 Shownotes of the Inside the Core Podcast cover this succinctly so I will not repeat it here but FWIW I have cached Safari artefacts in all three forms on the box I have examined. Currently Netanalysis and Encase do not parse the Safari Cache.db file so another method is required.

Safari Cache.db basics
What follows I believe relates to versions 3, 4 and 5 of Safari running in Mac OSX.
The file contains lots of information including the cached data, requesting URL and timestamps. The file is a Sqlite3 database file which has become a popular format to store cached browser data. The cache.db database contains four tables. For the purposes of this post think of each table as a spreadsheet with column headers (field names) and rows beneath representing individual records.
Two tables are of particular interest:

  • cfurl_cache_blob_data
  • cfurl_cache_response

cfurl_cache_blob_data contains one very notable field and a number of slightly less useful ones. The notable field is receiver_data which is used to store the cached item itself (e.g. cached jpgs, gifs, pngs, html et al ) as a BLOB. A BLOB is a Binary Large OBject. Two other fields request_object and response_object contain information relating to the http request/response cycle also stored as a BLOB which when examined further are in fact xml plists. The entry_ID field is the primary key in this table which will allow us to relate the data in this table to data stored in other tables.

cfurl_cache_response contains two notable fields - request_key and time_stamp. The request_key field is used to contain the URL of the cached item. The time_stamp field is used to store the time (UTC) the item was cached. The entry_ID field is the primary key in this table which will allow us to relate the data in this table to data stored in cfurl_cache_blob_data.

In a nutshell cfurl_cache_blob_data contains the cached item and cfurl_cache_response contains metadata about the cached item.

Safari cache.db examination methods
I would like to share three different methods using SQL queries and a few different tools.

Safari cache.db examination methods - contents quick and dirty
Safari cache.db examination methods - metadata quick and dirty
Safari cache.db examination methods - contents and metadata

Safari cache.db examination methods - contents quick and dirty
Depending on what you wish to achieve there are a number of different methods you can adopt. As regular readers will know I work on many IPOC cases. If all you want to do is quickly review the contents of cache.db (as opposed to the associated meta data) I can not recommend any application more highly than File Juicer. This application runs on the Mac platform (which I know is a gotcha for some) and parses out all cached items into a neat folder structure.

I drag the File Juicer output folders into Encase as single files and examine the contents further there. File Juicer is not a forensic tool per se but the developer has at least considered the possibility that it may be used as such. If using a Mac is not an option a Windows app SQL Image Viewer may suffice (with the caveat that I have not actually tested this app).

Safari cache.db examination methods - metadata quick and dirty
Sometimes overlooked is the fact that most caches contain internet history in the form of urls relating to the cached item. The cfurl_cache_response table contains two fields - request_key and time_stamp containing useful metadata. We can use an SQL query to parse data out of these fields. I use (for variety more than anything else) two different tools (i.e. one or the other) to carry out a quick review of meta data.

Method A using Sqlite3 itself (http://www.sqlite.org/download.html scroll down to the Precompiled Binaries for Windows section)

  • extract your cache.db file into a folder
  • copy sqlite3.exe into the same folder [to cut down on typing paths etc.]
  • launch a command prompt and navigate to your chosen folder
  • Type sqlite3 cache.db
  • then at the sqlite prompt type .output Cache_metadata.txt [this directs any further output to the file Cache_metadata.txt]
  • at sqlite prompt type Select time_stamp, request_key from cfurl_cache_response; [don't forget the semi colon]
  • allow a moment or three for the query to complete the output of it's results
  • Launch Microsoft Excel and start the Text Import Wizard selecting (step by step) delimited data, set the delimiters to Other | [pipe symbol] and set the Column data format to Text
  • Click on Finish then OK and bobs your uncle!

Click image to view full size

Method B using SQLite Database Browser as a viewer in Encase

  • from your Encase case send the Cache.db to SQLite Database Browser
  • on the Execute SQL tab type in the SQL string field enter Select time_stamp, request_key from cfurl_cache_response
  • Review results in the Data returned pane
Or
  • from your Encase case send the Cache.db to SQLite Database Browser
  • File/Export/Table as CSV file
  • Select the cfurl_cache_response Table name
  • Open exported CSV in Excel and adjust time_stamp column formatting (a custom date format is required to display seconds)

Safari cache.db examination methods - contents and metadata
What we need to do here is extract the related data from both tables - in other words be able to view the time stamp, URL and the cached object at the same time. This can be done using SQLite2009 Pro Enterprise Manager. This program has a built in BLOB viewer that will allow you to view the BLOB data in hex and via a image (as in picture) viewer if appropriate.

  • Once you have launched the program open your extracted Cache.db file
  • In the Query box type (or copy and paste) all in one go
    SELECT cfurl_cache_blob_data.entry_ID,cfurl_cache_blob_data.receiver_data, cfurl_cache_response.request_key,cfurl_cache_response.time_stamp
    FROM cfurl_cache_blob_data, cfurl_cache_response
    WHERE cfurl_cache_blob_data.entry_ID=cfurl_cache_response.entry_ID

  • Then key F5 to execute the query
  • This will populate the results tab with the results
  • To view the cached object BLOB data in the receiver_data field highlight the record of interest with your mouse (but don't click on BLOB in the receiver_data field). This will populate the hex viewer (bottom left) and the BLOB viewer (bottom right).
  • To view a full sized version of a cached image click with your mouse on BLOB in the receiver_data field which launches a separate viewing window

Click on image to view full size

References
SQLite Database File Format
Sindro.me weblog - Extracting data from Apple Safari's cache
http://www.devx.com/dbzone/Article/17403/1954
Inside the Core Episode 3 Show Notes
Define relationships between database tables -Techrepublic


Sunday 6 June 2010

Recovering Safari browser history from unallocated

One of my cases involves the examination of an Apple Mac running Mac OSX 10.5.6 Leopard . The primary web browser in use is Safari version 3.2.1. Typically with Safari I run the Comprehensive Internet History search in Encase but in this case the search would not complete so I had to consider another method to recover and review internet history. Browsing history is stored in a binary plist ~ /Users/User_Name/Library/Safari/History.plist however the live one was empty. I recalled from a much earlier case that you can carve deleted plists from unallocated. I had documented a method for doing this over at www.forensicwiki.com but at the time of writing this resource is still offline.

One of the best file carvers around is Blade and I decided to use it to recover the deleted History.plists. Blade has a number of pre-configured built in Recovery Profiles but there wasn't one for Safari. However one of the neat things about Blade is that you can write your own profiles and share them with others. In conversation I had found out that Craig Wilson had written a Safari history.plist recovery profile which he kindly made available to me (after all why re-invent the wheel). I imported it into my copy of Blade and I was then good to go.

Click image for a full size version


Another really neat feature with Blade is that you can run it across the Encase evidence files without having to mount them. Having done this in my case Blade recovered over three thousand deleted History.plist files. I then loaded the recovered plist files into Netanalysis 1.51 resulting in over 300,000 internet history records to review. Cool.


Thursday 27 May 2010

Prefetch and User Assist

It seems to me that more and more cases I see only have evidence within unallocated clusters. It is also a frustration that the CPS seem less and less interested in any artefact found there. They seem to have the view that any thing currently living in unallocated clusters somehow magically arrived there and has nothing whatever to do with the computer's user.

Obviously we try and address this misconception, by trying to investigate how the evidence in question came to be on the computer, and to a lesser extent how it came to be deleted. Which brings me on to another frustration - file wiping software. This is another thing I see more and more. Properly configured file wiping software eliminates the little fragments of evidence we use to piece our cases together.

Recently I was faced with this scenario - evidence could only be found in unallocated and there was file wiping software sat there in program files. Sentencing Advisory Panel guidelines allude to the presence of file wiping software being an aggravating factor to consider when sentencing. But in this case it occurred to me that it would be evidentially useful to know just how often my suspect used the file wiping software concerned. File time stamps may indicate when the program was last executed and installation dates can be discerned from a variety of locations (registry entries, folder creation dates and so on) but where do you establish how often the program was used? You never know -it may write to a log file or create event log entries but many don't. In my case the answer lay in two areas - Prefetch and User Assist.

Prefetch
My suspect was using Microsoft Windows XP. This OS (as the later Vista and Windows 7) performs application and boot prefetching. This process is designed to speed up the loading of applications (with regards to application prefetching) by storing data required by the program during the first ten seconds of use in a file - a prefetch file. These files are stored in the Windows/Prefetch folder and have a .pf file extension. The file names are a combination of the applications name and a hash of its file path. The hash may be useful in some cases because it could indicate that an application lives in more than one location (which is often suspicious). Some work on analysing the hash algorithm has been carried out by Yogesh Khatri at 42llc. The files themselves contain some useful information including last time of execution, the number of times the program was run and references to files and the file system utilised by the program in its first ten seconds of use. Unfortunately prefetch files are not differentiated by user. In my case the file wiping software had a prefetch file. There are a number of options open to us to analyse the prefetch file.

If all you need is the time of last execution and number of time the application was run for just one file you may as well do it manually. For Windows XP at file offset 120 an 8 byte Windows Filetime is stored which is the Last Execution Time. At file offset 144 the number of executions is stored as a four byte Dword. For Vista and Windows 7 the offsets are different - 128 and 152 respectively.


Bookmarking Last Execution Time and Date


Bookmarking number of times the application was run

If you have a number of prefetch files to analyse or you wish to corroborate your findings you could try the Mitec Windows File Analyzer program or run an enscript. Guidance Software's download center has two enscripts that fit the bill. PfDump.Enpack and Prefetch File Analysis. Pfdump outputs to the console and the Prefetch File Analysis enscript outputs to bookmarks.

UserAssist
UserAssist is a method used to populate a user's start menu with frequently used applications. This is achieved by maintaining a count of application use in each users NTUSER.DAT registry file. I use Access Data's Registry Viewer application to parse and decode this information. Simon Key has written a cool enscript which is bang up to date with Windows 7 support. Detailed information, including the changes introduced with Windows 7, and the script can be found within GSI's download center.

In my case I encountered a possible anomaly in that the Prefetch and UserAssist run counts were different. With multiple users you would expect this as the Prefetch run count is not user specific. I had only one user in my case and the UserAssist count was significantly greater albeit that both were four figure numbers. A possible explanation is that if the application's prefetch file is deleted when the application is next used the prefetch run count starts again from 1.

References
https://42llc.net/index.php?option=com_myblog&show=Prefetch-Files-Revisited.html&Itemid=39
http://en.wikipedia.org/wiki/Prefetcher
http://members.rushmore.com/~jsky/id14.html
http://members.rushmore.com/~jsky/id37.html
http://jessekornblum.com/presentations/dodcc08-2.pdf


Tuesday 11 May 2010

C4P Import to Encase enscript and Lost Files

Many C4P users experience problems when importing bookmarks back into Encase from C4P. A common problem is that files bookmarked in Unallocated Clusters don't match up to actual picture data. Almost always the cause of this problem is that the user has run the Recovered Folders process in Encase after running the C4P Graphics Extractor enscript thus altering the amount of unallocated clusters (as calculated by Encase). Trevor has a two page pdf on the C4P website addressing all the potential issues.

I have noticed another problem. A large number of my notable files are in Lost Files. Lost Files in Encase on an NTFS volume are files that have an MFT entry but their parent folder has been deleted. It is possible to have a number of files in the virtual Lost Files folder that have the same file name (and path). In my current case where I have duplicate file names in Lost Files the C4P Import enscript has not always bookmarked the correct file, bookmarking another file with the same name and path instead. This is sometimes further complicated by the incorrect file being deleted and overwritten.

The symptoms of this problem are easy to detect. Viewing your C4P import within the Encase bookmarks tab in gallery view results in a number of pictures not being displayed. When checking the bottom pane in text view you see that the bookmarked data for the non displaying pictures does not relate to a picture. Alternatively the picture you see does not relate to the C4P category it should be. To review this I am currently selecting (blue ticking) all non displaying pictures or wrongly bookmarked pictures and then tagging these selected files. Having done this in Entries view I am sorting by selection (blue tick) then highlighting a blue ticked file, then sorting by name. This brings all the other files with the same name together in Entries view. I am then checking the others to find the file that was meant to be bookmarked.

The underlying problem is a small bug in the C4P Import v2 enscript. Trevor has now kindly fixed it for me and will no doubt circulate the revised script. However in the meantime to fix the script

Find the following file in the import script folder: ..\include\ProcessReportClass.EnScript

In there, find the following function:

EntryClass FindByFullPath(ImportRecordClass irc, CaseClass c)

It’s a short function, only eight lines – highlight them, and replace with the following:

EntryClass FindByFullPath(ImportRecordClass irc, CaseClass c){

EntryClass e = c.EntryRoot();

e = e.Find(irc.DeviceName + "\\" + irc.Path);

if(e){

if(e.PhysicalLocation() == irc.PhysicalLocation)

return e;

else

return null;

}

else

return null;

}

Save and update.

HTH someone :)


Tuesday 13 April 2010

Volume Shadow Copy Forensics - the Robocopy method Part 2

Without further ado this post will build upon Volume Shadow Copy Forensics - the Robocopy method Part 1. In part one we looked at using Robocopy to extract data from a single shadow copy at a time. We will now look at a method to extract data from a range of shadow copies in one go. I will also cover some slightly more advanced options.

What are we going to need?
For what follows we will need a Windows 7 box (real or a VM), Encase with the PDE module and some storage space formatted NTFS. Robocopy is pre-installed within Windows 7.

Method
You will already have an Encase image of the drive you wish to investigate. When this is loaded up into an Encase case you need to gather some information in respect to the shadow copies you wish to investigate further. You will need to note the File Creation dates and if you wish to be more precise establish the Shadow Copy IDs stored at File Offset 144 for 16 bytes - bookmark as a GUID in Encase. Next you will have to mount the volume containing the shadow copies as an emulated disk using the Encase PDE module with caching enabled. On my box the mounted volume was allocated the drive letter J. I am using a Windows 7 box - if you are using a Windows 7 VM add the PDE mounted disk to the VM as an additional hard disk. Then on your box or in the VM:

Run a Command Prompt as Administrator and type the command (substituting J for the drive letter allocated to your mounted volume and G:\Shadows with the path of your export directory):

vssadmin list shadows /for=J: > G:\Shadows\list_of_shadow_copies.txt

This will create a text file containing a list of available shadow copies. From the list we can identify a range of shadow copies that we wish to investigate further. We now need to create symbolic links to them using the command:

for /l %i in (22,1,24) do mklink /d c:\Users\Richard\Desktop\Symbolic\SC%i \\?\GLOBALROOT\Device\HarddiskVolumeShadowCopy%i\

note: there is not a space after the ?

This command will create symbolic links for all shadow copy IDs starting at 22 up to 24. Obviously vary the (22,1,24) part to suit - 22 is the start, 1 increments by 1 and 24 is the end value. The symbolic links in this example are being created in a folder C:\Users\Richard\Desktop\Symbolic that I have allocated for this purpose. Many walk throughs, including ones I have prepared, often create the symbolic links at the root of C. Vista and Windows 7 do not like files being stored there so I think it is better practise to create the symbolic links in a user area.

OR
If you do not wish to process a range of shadow copies but need to process more than one or two you can instead use the command:

for %i in (18 20 22) do mklink /d c:\Users\Richard\Desktop\Symbolic\SC%i \\?\GLOBALROOT\Device\HarddiskVolumeShadowCopy%i\

note: there is not a space after the ?

In this example the command process only shadow copy IDs 18, 20 and 22.


Next we will run robocopy over the range of shadow copies we have selected:

for /l %i in (22,1,24) do robocopy c:\Users\Richard\Desktop\Symbolic\SC%i\Users G:\Shadows\SC%i *.jpg *.txt /S /COPY:DAT /XJ /w:0 /r:0 /LOG:G:\Shadows\Robocopy_log_SC%i.txt

OR
for %i in (18 20 22) do robocopy c:\Users\Richard\Desktop\Symbolic\SC%i\Users G:\Shadows\SC%i *.jpg *.txt /S /COPY:DAT /XJ /w:0 /r:0 /LOG:G:\Shadows\Robocopy_log_SC%i.txt

where you are interested in just specific shadow copies.

This command will create output folders named after each selected shadow copy along with a log of what has been copied. These items are being stored within an export folder prepared for the purpose. In this example I have drilled down to just the Users folder and copied out only jpg and txt files. Please see Part 1 for a detailed explanation of the options used in the command. The output folders can be dragged into Encase as single files. All paths and timestamps have been preserved.

Network Shares instead of Symbolic Links alternative
In part 1 I touched upon possible permission and copying errors. Troy Larson from Microsoft commented that creating shares instead of symbolic links may overcome some issues. So as an alternative the command:

for /l %i in (22,1,24) do net share SC%i=\\.\HarddiskVolumeShadowCopy%i\

will create network shares entitled SC22, SC23 and SC24 for the shadow copy IDs 22-24. We can now use robocopy to copy data out of these shares:

for /l %i in (22,1,24) do robocopy \\localhost\SC%i\Users G:\Shadows\SC%i *jpg *.txt /S /COPY:DAT /XJ /w:0 /r:0 /LOG:G:\Shadows\Robocopy_log_SC%i.txt

In this example I am accessing the shares on the same box hence localhost but of course you can run this across a network. The resulting data is as before.
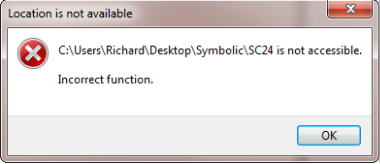
Incorrect Function
You may run into what I think is a permission related error - clicking on the symbolic link results in


or you see

2010/04/12 15:25:28 ERROR 1 (0x00000001) Accessing Source Directory c:\Users\Richard\Desktop\Symbolic\SC22\Users\Incorrect function.

in your log file.

I have tried myriad ways to overcome this - trying to take ownership of the Shadow Copies using cacls, icacls and everything else but the kitchen sink. However I did eventually find a workaround. In Volume Shadow Copy Forensics.. cannot see the wood for the trees? I discussed imaging shadow copies using George Garner's Forensic Acquisition Utility. This utility appears not to have this issue so the command

for /l %i in (22,1,24) do dd if=\\.\HarddiskVolumeShadowCopy%i of=G:\Shadows\%i.img bs=512 count=1 --localwrt

will image just one sector of each shadow copy in our range. This takes just a few seconds. Then after imaging make your symbolic links or network shares. The Incorrect Function issue is overcome. Don't ask me why.

Cleaning Up
At the conclusion of your investigations you will want to remove the symbolic links or network shares you have created.

To remove the symbolic links

for /l %i in (22,1,24) do rd c:\Users\Richard\Desktop\Symbolic\SC%i

To remove the shares

for /l %i in (22,1,24) do net share SC%i /delete

Dealing with the storage issues
If you want to copy substantial amounts out of a large number of shadow copies you are faced with the problem of where you can store it. In Volume Shadow Copy Forensics.. cannot see the wood for the trees? I observed that there is considerable duplication of files in each shadow copy. I have found that a utility like Duplicate and Same Files Searcher can be useful. This utility can search across your export folders and identify duplicates. You can then opt to retain the first file and then create hard links for all the duplicate files. This utility can also move duplicate files, thus allowing you to focus on just the unique files.

References
Windows 7: Current Events in the World of Windows Forensics Harlen Carvey, Troy Larson
Reliably recovering evidential data from Volume Shadow Copies in Windows Vista and Windows 7 QCC


Tuesday 6 April 2010

Volume Shadow Copy Forensics - the Robocopy method Part 1

There is always more than one way to skin a cat and so I make no apologies for discussing another approach to processing volume shadow copies. This approach - I'll call it the Robocopy method - has been researched and developed by the chaps over at QCC, John Douglas, Gary Evans and James Crabtree and they have kindly let me crib from their notes. This post is Part 1 - I have simplified QCC's approach but have also removed some functionality. In Part 2 I will expand on the simplified approach and add back in some functionality.

Robocopy is a robust file copying utility developed by Microsoft. This method allows us to copy out folders and files of interest from any notable shadow copies. The process will preserve folder and file paths and timestamps. The key advantages are that it is efficient -both in storage and speed.

This blog post complements my previous posts Vista Volume Shadow Copy issues and Volume Shadow Copy Forensics.. cannot see the wood for the trees? and the method documented below is similar in the early stages.

What are we going to need?
For what follows we will need a Windows 7 box (real or a VM), Encase with the PDE module and some storage space formatted NTFS. Robocopy is pre-installed within Windows 7.

Method
You will already have an Encase image of the drive you wish to investigate. When this is loaded up into an Encase case you need to gather some information in respect to the shadow copies you wish to investigate further. You will need to note the File Creation date and if you wish to be more precise establish the Shadow Copy ID stored at File Offset 144 for 16 bytes - bookmark as a GUID in Encase. Next you will have to mount the volume containing the shadow copies as an emulated disk using the Encase PDE module with caching enabled. On my box the mounted volume was allocated the drive letter I. I am using a Windows 7 box - if you are using a Windows 7 VM add the PDE mounted disk to the VM as an additional hard disk. Then on your box or in the VM:

Run a Command Prompt as Administrator and type the command (substituting I for the drive letter allocated to your mounted volume)

vssadmin list shadows /for=I:

This will result in a list of all available shadow copies on the selected volume

vssadmin 1.1 - Volume Shadow Copy Service administrative command-line tool
(C) Copyright 2001-2005 Microsoft Corp.

Contents of shadow copy set ID: {2202d8a9-1326-4254-9818-252ece858b17}
Contained 1 shadow copies at creation time: 10/12/2009 14:41:25
Shadow Copy ID: {ad2e71d0-48d6-44b9-9715-f5ff6b5a5643}
Original Volume: (I:)\\?\Volume{34e5a98a-1a1d-11df-a259-00236cb6de69}\
Shadow Copy Volume: \\?\GLOBALROOT\Device\HarddiskVolumeShadowCopy5
Originating Machine: Richard-MBP-Vis
Service Machine: Richard-MBP-Vis
Provider: 'Microsoft Software Shadow Copy provider 1.0'
Type: ClientAccessibleWriters
Attributes: Persistent, Client-accessible, No auto release, Differentia
l, Auto recovered

Contents of shadow copy set ID: {e13bb9d9-c522-422b-b92a-37f6d12363d9}
Contained 1 shadow copies at creation time: 15/12/2009 12:17:37
Shadow Copy ID: {d0e1c613-7892-47e1-9b7e-f638adac9d16}
Original Volume: (I:)\\?\Volume{34e5a98a-1a1d-11df-a259-00236cb6de69}\
Shadow Copy Volume: \\?\GLOBALROOT\Device\HarddiskVolumeShadowCopy6
Originating Machine: Richard-MBP-Vis
Service Machine: Richard-MBP-Vis
Provider: 'Microsoft Software Shadow Copy provider 1.0'
Type: ClientAccessibleWriters
Attributes: Persistent, Client-accessible, No auto release, Differentia
l, Auto recovered

Marry up your bookmarked GUID to the Shadow Copy ID number to identify the Shadow Copy Volume you wish to process. The next step is to create a symbolic link to the selected shadow copy (ShadowCopy6 in this example) by typing the command

mklink /d C:\shadow_copy6 \\?\GLOBALROOT\Device\HarddiskVolumeShadowCopy6\

which results in the output

symbolic link created for C:\shadow_copy6 <<===>> \\?\GLOBALROOT\Device\Harddisk
VolumeShadowCopy6\

We are now going to use robocopy to copy out data from the mounted shadow copy - for this example I have created a folder called SC6 on my export volume. The command I used for this example is

robocopy C:\shadow_copy6\Users\Richard G:\SC6 /S /XJ /COPY:DAT /NFL /NDL /w:0 /r:0

This results in robocopy outputting a Job Header to the console

---------------------------------------------------------------------------
ROBOCOPY :: Robust File Copy for Windows
---------------------------------------------------------------------------
Started : Mon Apr 05 11:23:18 2010
Source : C:\shadow_copy6\Users\Richard\
Dest : G:\SC6\
Files : *.*
Options : *.* /NDL /NFL /S /COPY:DAT /XJ /R:0 /W:0
---------------------------------------------------------------------------

The header usefully sums up what I have asked robocopy to do.

  • I am copying only the Richard user profile (Users\Richard) to my export folder SC6
  • *.* indicates that I am copying all files
  • /NDL suppresses directory listings to the console
  • /NFL suppresses file listings to the console
  • /S copies the source folder and all sub folders and files
  • /COPY:DAT copies data, attributes and timestamps
  • /XJ exclude junction points
  • /R:0 number of retries on failed copies (in other words -do not re try)
  • /W:0 wait between retries

Nothing much happens at the command prompt now unless a failed file copy is encountered when you will receive output to the console similar to

2010/04/06 11:24:48 ERROR 5 (0x00000005) Copying File C:\shadow_copy6\Users\Rich
ard\AppData\Local\Temp\~DFA2ED.tmp
Access is denied.

When the copying is completed a summary is outputted to the console


It can be seen that 17 directories have been skipped. This means they have not been copied -probably because of permission issues. Also notable is the copying speed which is much quicker than imaging.

The output folder now contains a copy of the Richard users profile. Drag the contents of the export folder into Encase which processes the contents as single files. You may wish to create a logical evidence file of these single files.

Alternative Robocopy Configuration
As inferred from the Job Header above it is possible to take a fairly granular approach to what is copied out of your shadow copy. For example the command

robocopy C:\shadow_copy6\Users G:\SC6 *.jpg *.bmp *.png /S /XJ /COPY:DAT /NFL /NDL /w:0 /r:0

will copy out all jpg, bmp and png files from all User profiles. With reference to the two examples in this post and the robocopy manual it is possible to configure the copy operation in many different ways. For example you could just copy files that have timestamps in a particular range or files that are greater than a particular size.

Incorrect Function
If you play with VSCs often you will run into this rather helpful Microsoft error message. Tips to overcome it in Part 2.

References
Windows Vista/7 Recovering evidential data from Volume Shadow Copies John Douglas
http://technet.microsoft.com/en-gb/library/cc733145(WS.10).aspx
http://blogs.sans.org/computer-forensics/2009/01/08/robocopy-–-a-computer-forensics-tool/
http://42llc.net/index.php?option=com_myblog&task=tag&category=robocopy&Itemid=39